4.0 The Map Display
4.1 Introducing The National Map Viewer Interface
The following diagram (Figure 4-1) highlights the key features on The National Map Viewer
interface. Refer to the corresponding numbers below to learn more about each
feature.
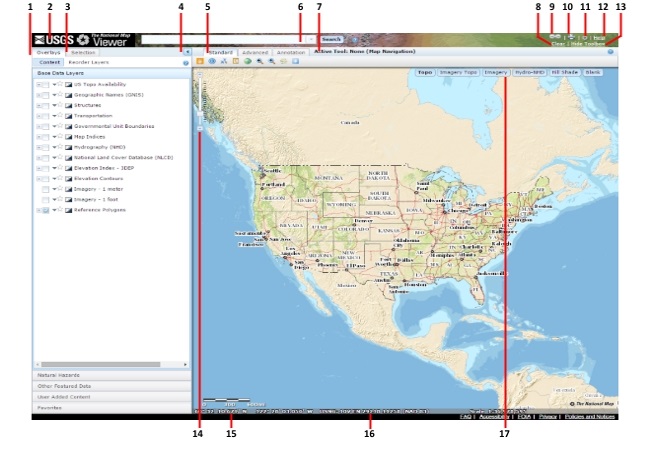
- The Overlays tab contains a collection of map overlay layers. Once a layer is
selected in the Overlays pane, it becomes visible on the map display. Layers can be
reordered on the map using this pane. For more information, see Section 7.0 The Overlays Tab.
- The USGS Logo is a link to the official U.S. Geological Survey site: http://www.usgs.gov/
- The Selection tab contains results returned from selecting features or
searching for locations. Identifiable layers can be set using this pane as well. For
more information, see Section 8.0 The Selection
Tab.
- The Left Pane button expands and collapses the left window pane, which
contains the Overlays and Selection tabs.
- The Toolbox contains a variety of tools that can be used on the map display.
For ease of use, the toolbox is divided into three tabs: Standard, Advanced, and
Annotation. For more information, see Section 5.0 The
Toolbox.
- The Search field is used to search for locations on the map. Map services and
KML can be added to the map using this field as well. For more information, see Section 6.0 Search.
- The Active Tool text displays the current active tool in The National Map
Viewer. For more information, see Section 5.1 The
Toolbox.
- The Clear button allows you to clear any graphics or annotation markups that
were created on the map display.
- The Link button is a permalink feature that saves the current map extent. You
can work more efficiently by copying and saving this link in your preferred browser.
For more information, see Section 4.6 Link Button.
- The Print menu contains tools that are used to save as various file types and
print the current map view. For more information, see Section
4.5 Print.
- The Options dialog contains various Coordinate Display and Selection Manager
Display options. For more information, see Section 4.3
Options.
- The Help dialog contains quick reference help to Search FAQs, Map Navigation,
and Search Box coordinate formats. For more information, see Section 4.4 Help.
- The Hide Toolbox/Show Toolbox option toggles the toolbox on and off in order
to maximize viewable space within the display. For more information, see Section 5.1 The Toolbox.
- The Zoom Slider is used to zoom in and out on the map display. For more
information, see Section 4.2 Navigate the Map Display.
- The Cursor Position displays the coordinates of the current cursor position
on the map display. Each time the mouse pointer is moved, the coordinates change to
reflect the current position.
- The Scale is displayed to show the current map scale. For more information,
see Section 4.2 Navigate the Map Display.
- Topo, Imagery Topo, Imagery, Hydro-NHD, Hill Shade, and Blank buttons change the base map on the
display. The Imagery buttons toggle to show labels, and the Blank button toggles to
show land and water outlines. For more information, see Section 4.7 Change the Base Map.
4.2 Navigate the Map Display
4.2.1 Pan
Several pan functions are available in The National Map Viewer. Panning allows you to
change the current map extent to view data that is currently out of the present view.
Panning with the Keyboard
- Click the up arrow key on the keyboard to pan north.
- Click the down arrow key on the keyboard to pan south.
- Click the right arrow key on the keyboard to pan east.
- Click the left arrow key on the keyboard to pan west.
Panning with the Mouse
- Hold the mouse button down while the cursor is on the map display.
- Drag the display to the desired location (the crossed arrows pointer
 appears), then
release the mouse button.
appears), then
release the mouse button.
4.2.2 Zoom
Several zoom functions are available in The National Map Viewer. Zoom functions provide
the capability to change the scale of the map view.
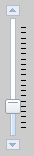
Zooming with the Zoom Slider
Figure 4-2 displays the features of the Zoom Slider. The corresponding number
below describes how to use each feature.
- Click the up arrow of the Zoom Slider to zoom in on the map
display.
- Drag the Zoom Slider up or down to zoom in or out incrementally.
- Click the down arrow of the Zoom Slider to zoom out on the map display.
Zooming with the Keyboard
- To zoom in, use the plus sign (+) key on the keyboard.
- To zoom out, use the minus sign (-) key on the keyboard.
Zooming with the Keyboard and Mouse
- To zoom in, hold down Shift and the mouse button while dragging a box around the
desired location.
- Release the mouse button.
- To zoom out, hold down Shift + Ctrl and the mouse button while dragging a box around
the location.
- Release the mouse button.
Zooming with the Mouse
- To zoom in, double-click on the map display.
Zooming with the Mouse Scroll Wheel
- To zoom in, roll the mouse wheel forward (away from your hand).
- To zoom out, roll the mouse wheel back (toward your hand).
4.2.3 Re-center the Map
You can re-center the map on a given point.
- Hold down the Shift key and use the mouse to click a point where you want the map
to be centered.
- The map display pans to the clicked location.
4.3 Options
The Options dialog provides a means for you to customize The National Map Viewer
interface by selecting the Coordinate Display and Selection Manager Display options
(Figure 4-3).
4.3.1 Coordinate Display
The Options dialog allows you to change the format of the coordinates that are
visible at the bottom of the map display. Use the Coordinate Display option to choose
the coordinate format you prefer. By default, the Coordinate Display option is set to
Decimal Degrees.
- Click the Options link.
- Select the coordinate format of your choice in the Coordinate Display option (Figure
4-4).
- Decimal Degrees
- DMS - Degrees, Minutes, Seconds
- MGRS - Military Grid Reference System
- USNG (NAD 83) - US National Grid (North America Datum 1983)
- Click the Save button. The Options dialog box is closed, and the coordinate format
visible at the bottom of the map display is updated (Figure 4-5).
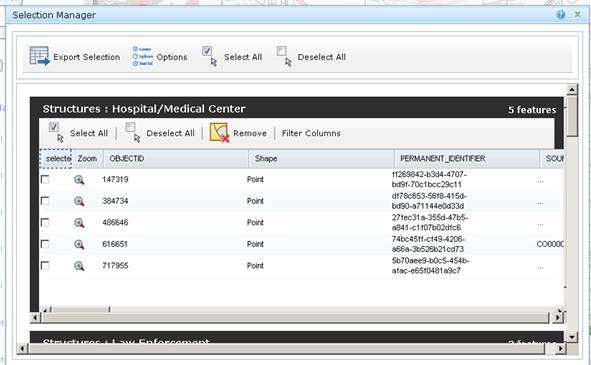
4.3.2 Selection Manager Display
The Selection Manager Display option on the Options dialog box allows you to
change the version of Selection Manager. You can select either the Enhanced or Standard
version. The Enhanced version allows you to sort features by column and to resize
columns. However, it may require a greater processing time if viewing a large number of
selections. The Standard version does not allow you to sort features or resize
columns, but it performs better (is faster) than the Enhanced version. It is recommended
that you use the Standard version if you are viewing a large number of features. By
default, the Selection Manager Display option is set to Enhanced.
- Click the Options link.
- Select Standard (Performance) for the Selection Manager Display option
(Figure 4-6).
- Click the Save button.
- Open the Selection Manager tool under the Advanced Toolbar (Figure
4-7).
4.4 Help
The Help dialog contains information such as a Search FAQs capability,
Map Navigation shortcuts, and Search Box coordinate input examples.
In addition to the Help dialog box, help is provided on each tool dialog box.
Click on the Help button on the top right corner of the dialog box to open an
HTML version of help for that tool.
4.4.1 Search FAQs
The Search FAQs tab allows you to review answers to frequently asked questions
through keyword searches in various categories. You can also access user guides, a list
of services, and a few examples and demos of various functions and services. You can
find this information in the Help section in the application.
- Click the Help link.
- Navigate to the Search FAQs tab in the Help dialog box (Figure 4-8).
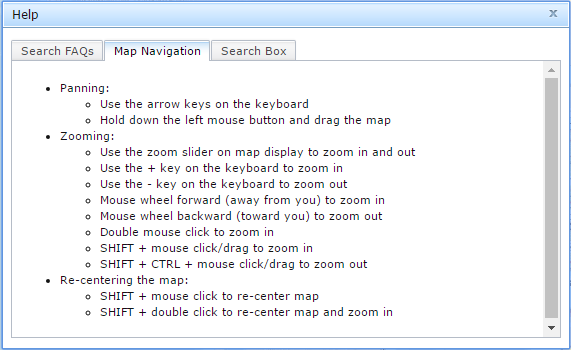
4.4.2 Map Navigation
The Map Navigation tab of the Help dialog box contains information about
how to navigate the map display. Various ways of panning, zooming, and re-centering the
map are described in this tab.
- Click the Help link.
- Navigate to the Map Navigation tab of the Help dialog box (Figure 4-9).
4.4.3 Search Box
The Search Box tab of the Help dialog box contains information about how to search
by coordinates. Acceptable formats for coordinate searching are depicted in this tab.
See Section 6.0 Search for more information about
searching.
4.5 Print - Save As
The Print tool allows you to export the map view and save as a temporary PDF, JPEG
or PNG document for printing.
The Print tool is accessed by clicking on the Printer icon at the top right
of The National Map Viewer title bar. When exporting a map to a PDF document, you have
the option to modify the page size or layout and to add optional map elements, including
a map title and notes, such as for projection information, classification, handling
caveats, legend, and search or query results.
Printing the map as an image (JPEG or PNG) does not allow you to add map elements in the
header, such as a map title and notes. The resulting map layout follows a standardized
template, and can be saved locally or printed from a link generated by the SaveAs
Exporter.
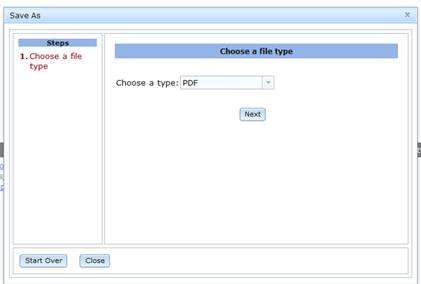
-
Click on the Printer icon at the top right of the page to open up the
SaveAs Exporter (Figure 4.10). Choose the file type you would like: PDF,
JPEG, or PNG.
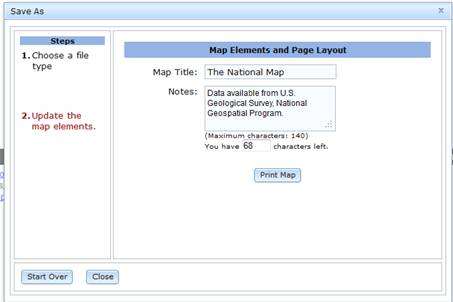
-
Populate the Map Elements and Page Layout with a Map Title and Notes (if a
PDF). Then click on Print Map (Figure 4-11).
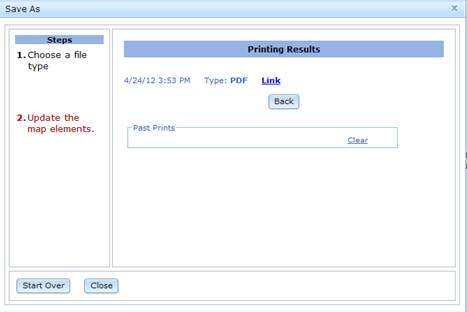
-
Click on the Link to obtain the requested document in the Printing Results
window (Figure 4-12).
4.6 Link
The Link dialog is for capturing map extents as a bookmark. It creates a permalink
of the map view and saves extent, base map, visible layers, search criteria, and any
added network links (KML). User added content and annotation are not saved. The link
launches a new session of The National Map Viewer.
When you click on Link, a pop-up dialog box appears with the permanent link of the
current map view. Copy and paste the URL into an e-mail, instant messenger window, or
bookmark this extent in the browser of your choice (i.e., Internet Explorer or Mozilla
Firefox). This feature allows you to work more efficiently because the map extent can be
shared with others and saved for future use.
4.6.1 Share Permanent Link
- Click Link to share the current map view.
- A pop-up dialog box appears with a URL address that you can copy and paste into an
e-mail or instant messenger window, or save as a link in your browser (Figure 4-13).
Select the URL below the Paste link in an email or IM label and copy it.
4.7 Change the Base Map
When you click a Base Map, Imagery, or Blank button, the base map layer will
automatically change. The background image will vary depending on which button you
select as a base map.
4.7.1 Base Map Labels
Base maps have labels associated with them. These labels can be turned on and off by
pausing the mouse cursor over the Base Map, Imagery, or Blank buttons, and toggling the
desired label(s) in the pop-up that is displayed. Base map label settings are saved when
you change base maps.
- Pause the mouse cursor over a Base Map, Imagery, or Blank button to display the
label options pop-up (Figure 4-14).
- Toggle the desired label on or off as desired. The labels are displayed or
hidden.
4.8 Loading Pane
The National Map Viewer displays a Loading pane (Figure 4-15) when loading layers or
processing tasks. It is initially displayed at the bottom right corner of the map
display and acts as a universal status bar for anything that makes a call to the server,
such as loading layers from the Content pane and running tools such as Identify. It
disappears when the content or task is complete.
The Loading pane is a movable pop-up that can be repositioned around the National Map
Viewer interface by the user. To move it, grab it while it is visible and drop it in the
desired location.